Have you ever wandered through a craft store, show or boutique and said to yourself, "I can make that!" I certainly have. Have I ever gone home and actually made it? ..... No. And I make stuff.
Sometimes things look so simple, but when you break it all down, to all of the materials needed, the steps involved, it's just simpler to support the original artist and bring home an awesome work of art.
Take this piece:
The Bird Nest Jar
It all started with this inspiration piece.
A picture page ripped out of an encyclopedia.
But did I use the actual paper page? Absolutely not! (I actually can't even remember where I got it.)
Here is what I did:
First, I scanned the original and saved it to my computer.
Then I cleaned up the ripped side in photoshop and printed it out in 3 different sizes.
Once I had the copies, I glued them to a heavier card stock. Then I distressed the edges and stained the pages with a liquid walnut stain. After I heat set the stain, I further "dirtied" up the edges with ink.
NEXT!
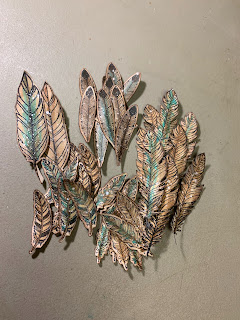
I needed feathers. I couldn't find feathers. At least not real bird colored feathers. What to do...
Head to the stamp stash. I have a lot of stamps. And a lot of them have coordinating dies. I like dies. Especially dies that work with stamps.
I stamped a page full of different feathers and cut them out with the dies. Have I said dies enough?
Then comes the coloring of the feathers. Here comes another of my favorites. COPIC MARKERS.
I used a blend of browns and blue/turquoise markers to color all of the feathers I had cut out.
Next it is on to distressing and staining the feathers. That's one plus to Copic Markers. They don't bleed when you add liquids over top. I inked the edges and covered them in the walnut stain and heat set to dry.
Okay, so now put it all together! Get your jar, you have a jar right? You have to have a JAR!
I hit up garage sales, antique markets, junk jaunts, and still only find a few precious beautiful jars worthy of use. But they are out there. Keep looking!
So you now have your jar. Add some moss to the bottom, get your nest, add some primitive looking eggs and tuck in your feathers. (I notice I just added a bunch of items you need that I hadn't listed prior... sorry)
You can see in the photo above, I added one of my encyclopedia pages to the inside of the jar behind the nest. To finish off the piece, I took a strip of muslin and stained it with... you know, Walnut Stain! Tying the muslin around the jar with some jute finishes off this piece.
Okay! So you got this right?
Now, what am I charging for the Bird Nest Jar in the photo above?
Guess.
You can't guess.
$16.00
Wait, what?
After I spent all this time listing all of the steps and all of the work involved, $16? Really? And that doesn't even count what I spent on everything I purchased to make it! I seriously need to rethink my pricing!
But here's the thing. I made more than one.
Remember I printed out 3 copies of the encyclopedia page. I had 3 different sized jars.
This fun jar didn't have a lid. ( I broke it... oops) Anyway, I added more stained muslin and cheesecloth to the top for a primitive look. These bigger jars have more room inside so I was able to add more details, like vintage family photos, calendars and birds.
So all in all, this is how it all comes together. I enjoy finding random things and working on the little details to make each and every piece unique. And FYI these bigger jars pictured here are priced $28 and $26 respectively.


No comments:
Post a Comment